How to Manually Install WordPress on cPanel?
Manually Install WordPress on cPanel: Website design is an important part of creating a business identity. WordPress is an open-source CMS available on the internet. It is designed for people to manage the website. Designing a website using wordpress is easy, as this is based on plugins. WordPress is easy to install and update. You can choose the themes as you’d like. People with limited tech experience can use it, and more tech-savvy folks can customize it. The first step to manually install wordpress is downloading the latest version from the official site. Could you follow the steps given here?
Step 1: Download WordPress
Download the most recent official CMS version. To do that, take the following steps:
- Go to the WordPress website https://wordpress.org/.
- Click Get WordPress.
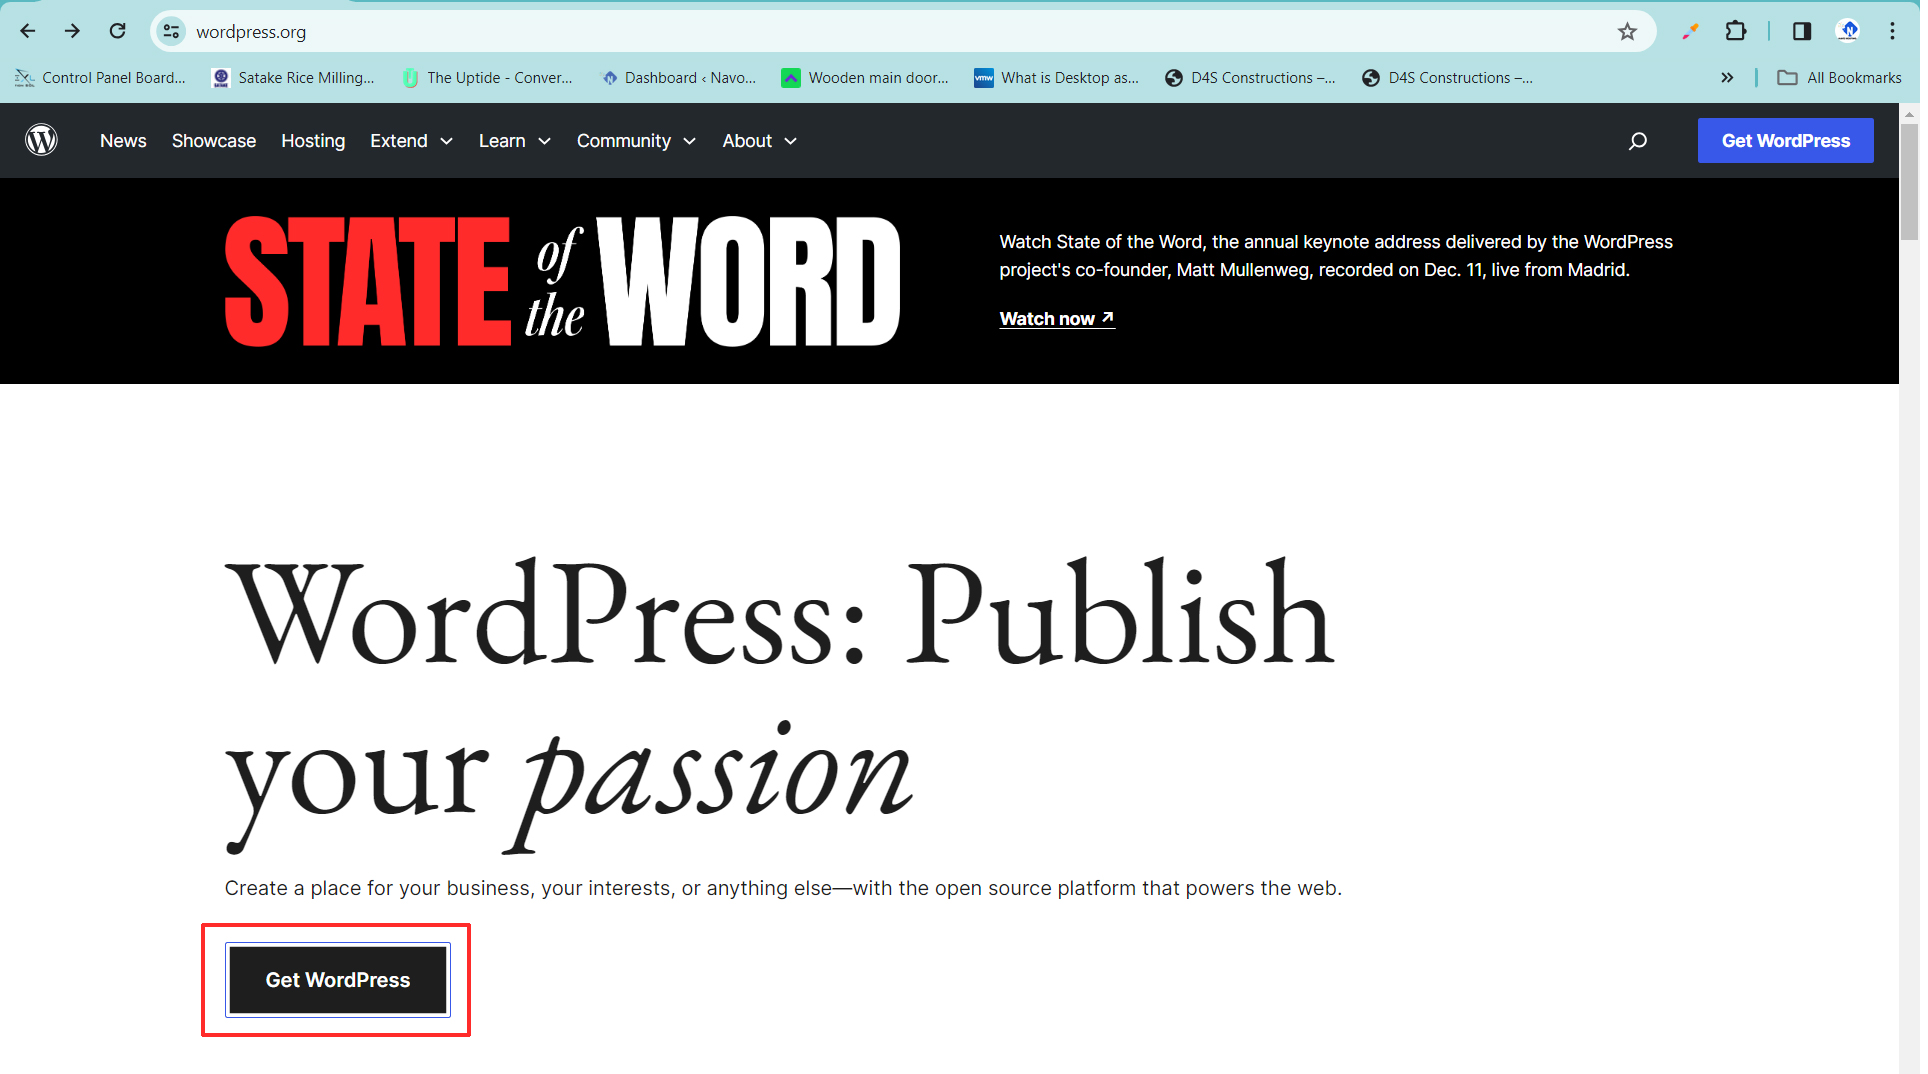
- On the next page, click Download WordPress to save the zip file.

- Wait for the file to download.

Step 2: Upload the WordPress Files onto the Server
- Go to your cPanel account by navigating to your_domain_name.com/cpanel in a web browser.
- Enter your credentials to log in.

- Scroll down to the Files section.
- Open the File Manager tool.

- Find the domain you want to install WordPress on.

- Hit the public_html file.
- Click the Upload button.

- Hit the Upload menu.
- Click Select File and navigate to the zip file.

- After the upload finishes, click the Go Back link to return to the previous directory.

- Right-click the zip file and select Extract.
- Start the process by clicking Extract Files.
- The files are extracted into a folder named wordpress. Enter the folder.
- Click the Select All and choose the Move action from the top menu.
- Delete the WordPress part, leaving only the main location, and click Move Files.
- Select Go Back from the top menu and delete the zip file and the empty wordpress folder.
Step 3: Create New MySQL Database
WordPress relies on a MySQL database to store its content, settings, and other crucial information. Creating a new MySQL database isolates WordPress data from other applications or websites on the server.
This separation ensures efficient data management and reduces the risk of conflicts. Follow these steps to create a database:
- Go to the cPanel Tools page.
- Scroll down to the Databases section.
- Select MySQL Databases.

- In the next window, create and name the new database.

Remember or write down the name since it will be needed later. Make sure to include the hosting account prefix added to the database name.
Step 4: Create a Database User
To create a user, scroll to the MySQL Users section and:
- Enter a username (seven characters maximum) and a password.

- Generate passwords using Password Generator.

- Make sure the strength meter turns green and reads Very Strong.

- Note the password or store it in a password manager.
Step 5: Assign User to Database and Assign Permissions
The newly created user needs access to the database:
- Find the Add User to Database section of the page.
- Under the User drop-down menu, select the newly created user.
- Click Add to the newly created database under the Database drop-down menu.

- Assign user privileges. Select the All Privileges checkbox, and uncheck the Drop checkbox (to prevent accidental or intentional removal of the entire database or its tables). Click Make Changes to assign privileges to the user.

How to access WordPress and install it on cPanel
Take the following steps:
- Go to your domain via a web browser. Choose the language and click Continue.
- Click Let’s Go! On the WordPress welcome page.
- Fill out the required info and click Submit when finished. Use the name of the MySQL database and MySQL user as the database name and username. The database host is a local host in most cases. Avoid using admin as the username and the default wp_ table prefix.

- Click Run the installation in the next window.
- Enter details such as the Site Title, your desired WordPress Username and Password, and the Email Address. The username and password are for this instance of WordPress only. Do not enter the same username and password used for the database user, and avoid using admin.
- All of this information can be changed later in the WordPress Admin.
- Click Install WordPress to start the process. WP redirects you to the login screen when the installation procedure is completed.

- Enter the credentials to access the WordPress admin panel.

Hope you learn about how to Manually Install WordPress on cPanel?. Find more topics related to website hosting and Google Workspace from us.
Navo Hosting is one of the best Google Workspace resellers in India. Get a Google Workspace plan at a competitive price from us. We also offer other services like domain & hosting, and website design services. To further know about our services contact us.
Our services
- Google Workspace
- Domain and Hosting
- Web design
